? QA Design Gurus: October 2015

Oct 31, 2015

How VMware Snapshots can save QA engineer's time

QA engineers generally spend a lot of time on installing software to setup the required test environment. VMware snapshots can save QA engineer's time in setting up the test environment.

Testing migration cases

Assume that you are executing a migration test plan. You have installed the first version of the software and executed some scenarios which are required for migration testing. Now you upgraded the software with say version 2 and executed the migration cases. Now you came to know that you missed one scenario or some extra cases got added to your migration test plan. To test this missed/extra test cases you need to install the software with version 1 and execute the scenarios required for missed migration cases. In this case, if you choose VMware instead of physical machine then it can save your time. After installing version 1 software you need to take the snapshot so that it can be used in future.

Ref: http://goo.gl/CZwl3g


Verifying customer issues

When a customer reports a critical case and assume in order to reproduce that case, you need to set up test environment which includes a lot of third-party software. To verify this case for a major release, you installed all required software and reproduced the issue successfully and upgraded the test environment with fixed version and you verified the issue. Now management decided to release a hotfix or service pack for this issue. You need to do the same work again to verify the same issue for hotfix/service pack release.  If we take a VM Snapshot after reproducing the customer issue then it can save QA time.

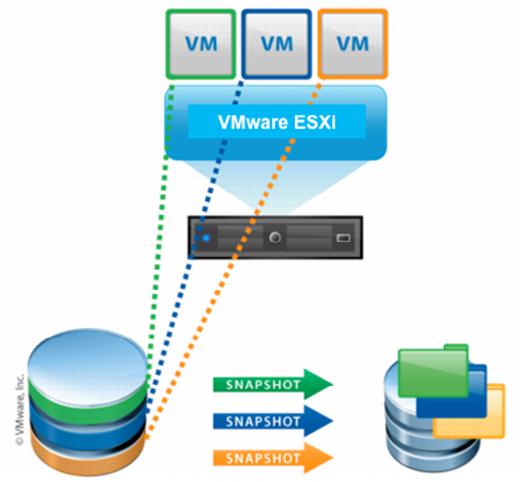
Maintain a VM snapshot for each release

Generally, any software release may have major, minor and hotfix releases. QA always works on current release. When we found an issue generally dev/higher management wants to know if it is a regression issue or a new issue. To find that QA may need to verify the issue in old release. In this case we need to install the previous version software. Another case for example may be as follows: customer reported an issue with some old version of product. QA/Support needs to install that particular version  to verify that issue. If we maintain a VMware snapshot for each release it can save QA time and sometimes Dev or Support teams time also.


Tip: How to use XPath in Web UI Automation(Telerik Test Studio)


The biggest challenge in Web UI Automation is finding an element in a dynamic web page where we have more than one similar elements. In these days, web pages in most of the cloud applications are auto generated. Even though we provide a unique id for each element we cannot rely on these ids as they are auto generated. Enterprise automation tools provide element repository and we can add some conditions to identify the element. This solution may not work sometimes. In this situation, using XPath we can easily identify the element. Most of the open source and enterprise automation tools supports XPath.

Ref: https://goo.gl/YCRnQX


Frequently used XPath elements examples as follows. I used Telerik Test Studio enterprise automation tool APIs in below examples

1) following-sibling

 For example, let's assume you have many check boxes in a web page. You want to find 3rd check box. You need to find a unique text near to that text box. Using that we can find that element using XPath. Assume text "three" is unique text nearby that text box. You may write XPath such as the one given below

Element e = Manager.ActiveBrowser.Find.ByXPath("//td[text()='three']/following-sibling::td[1]/input");
Manager.ActiveBrowser.Actions.Click(e);

2) preceding-sibling

//a[text()='three']/parent::td[1]/preceding-sibling::td[2]

3) parent

//a[text()='three']/parent::td[1]/preceding-sibling::td[2]


Example: 

If you want to click on the check box of particular email then you use the following XPath.

(//span[text()="SearchString"])[1]/parent::div[1]/parent::td[1]/preceding-sibling::td[3]/div

Here "SearchString" can be an email sender name. The above XPath returns the first occurrence.

You can use the following XPath to get the value of check box.

(//span[text()="SearchString"])[1]/parent::div[1]/parent::td[1]/preceding-sibling::td[3]/div/@aria-checked


If you find at least one unique string in the web page then you can traverse the page to find your desired element using XPath

Oct 30, 2015

Tip: Difference between Same and Exact compare types in TTS


In any test case we need to verify the actual result with expected results.
For this type of verifications most of the automation tools support only exact verification i.e. for example, if you want to verify abc is equal to ABC, you should either convert one of them to Upper/Lower case.

But in TTS we can avoid this case conversion just by choosing CompareType to Same in Inline Editor or Step Properties.


If the Compare Type is set to Same - The comparison will be insensitive.
If the Compare Type is set to Exact - The comparison will be case sensitive.

Tip: How to secure password using TTS

There will be many scenarios where you have to use your credentials while writing automation scripts. If it is a test account no one will bother, but if we want to provide our credentials then we will have to worry.

TTS provides a best option for securing the password. You need not bother/ worry that you have provided your sensitive data in the script.

In Telerik Test Studio, once you write/record the password step in a test, perform the below steps.
1. Select Password step in the test
2. Select the Properties tab from the footer on the right side of the pane.
3. Mark Encrypt checkbox.
4. Observe that the password is encrypted. After setting this Encrypt option, we cannot modify it back. The only way to enter the new password is to delete the password step and rerecord the step again.


For the same Password step, you will find another option called IsPassword.
Whenever you choose IsPassword option, it will just replace the password characters with asterisk(*), but if you just uncheck the IsPassword option you will be able to see the password in plain text.

Oct 23, 2015

Tip: How to get the IP Address of Raspberry Pi when performing IoT Testing

As a tester when we test any IOT application, we need to know the IP Address of  Raspberry Pi. Even if you know the IP Address when you test the application on another network, again you need to find the IP Address.

Generally, you can find the IP Address of your machine using ifconfig/ipconfig command if it is already connected to a network. To execute this command on Raspberry Pi, you need to connect using any command line tool like Putty. To connect Raspberry Pi using any command line tool you need IP Address.

Using the following ways you can get the IP Address of  Raspberry Pi.
  • Using IP scanner tool:- There are some IP Scanner tools available in the market. For this, your PC and Raspberry Pi should be on the same network.
            E.g. "Advanced IP Scanner"


Ref: http://goo.gl/16dqGb

  • Using Mobile App:- You can find the Raspberry Pi address in any home network easily using "Wifi Watch" mobile app. You can just connect the ethernet cable to Raspberry Pi and scan the network using this app. It lists the Raspberry Pi with it's IP Address.
Ref: https://goo.gl/24xIqZ


Above options will work only if you use the ethernet cable to connect the network. The network should connect automatically without typing any password.

If you use WiFi, to connect the network you need to type the password. One way of finding is, you should connect Raspberry Pi to TV using HDMI cable so that you can see the desktop. You need to connect Keyboard to type Wifi password. Once the network is connected you can type ifconfig command on the terminal to get the IP Address. Next time onwords you can use above mentioned tools to find the IP Address.

Instead of using these tools, we can get the IP Address automatically when Raspberry Pi is rebooted. 

Steps:

1) Write a Python script to find the IP Address
2)  Add logic to send the IP Address to an email or to any endpoint
3) Create a Cron job to run this python script on system reboot

Example:

In this example, we are sending IP Address to a cloud application built using Progress Rollbase. Python Script invokes a REST Service to send IP Address. Rollbase application triggers an email to user.

import socket
import os
import urllib2
gw = os.popen("ip -4 route show default").read().split()
s = socket.socket(socket.AF_INET, socket.SOCK_DGRAM)
s.connect((gw[2], 0))
ipaddr = s.getsockname()[0]
gateway = gw[2]
host = socket.gethostname()
response = urllib2.urlopen("https://www.rollbase.com/rest/api/login?loginName=xxxxx&password=xxxxx").read()
start = "<sessionId>"
end = "</sessionId>"
token=(response.split(start))[1].split(end)[0]
ipRequestString="https://www.rollbase.com/rest/api/create2?sessionId="+token+"&objName=configObj&ipaddress="+str(ipaddr)
print ipRequestString
urllib2.urlopen(ipRequestString).read()
print ("IP:", ipaddr, " GW:", gateway, " Host:", host)


Cron job:

To open Crontab editor in Vi Editor
Open terminal and execute export EDITOR=Vi
Execute "crontab -e". This will open a Vi Editor.  Enter the following line and  enter Esc + shift colon + w +  q to save the file.

@reboot sleep 60 /usr/bin/python /home/ipaddress.py


Oct 17, 2015

REST APIs Performance Testing using JMeter


JMeter allows us to test performance of both static and dynamic resources (web services like SOAP and REST APIs).
In this post, we will provide steps to test the performance of REST APIs

Installing and Running JMeter:

  • Download the JMeter apache-jmeter-2.13.zip from http://jmeter.apache.org/download_jmeter.cgi
  • Extract to any directory location (Ex: C:\). Note: Make sure that Java 6 or later version should be available)
  • Go to JMeter installation location -> bin directory and start 'jmeter.bat' file
  • Observe that JMeter user interface will launched successfully

Steps to write JMeter script for REST API test:


  • The first step is to create a Thread Group under Test Plan.
  • Thread Group is a placeholder for all other elements like Samplers, Controllers, and Listeners. We need one so we can configure number of users to simulate.
  • Right click on Test Plan -> Add -> Threads (Users) -> Thread Group. Name it.It has the options to provide 'Number of Users', 'Ramp-Up Time' and 'Loop Count'. Right now, provided 1 for all fields as shown in below image


  • Right click on Thread Group -> Add -> Sampler -> HTTP Request and provide server name, port number, path and add parameters. Save it. Note: Make sure that the server which you provided is up and running.


  • Add 'View Results Tree' to check the request status.Save it.

  • Click on Run icon to run the script.
  • Observe that script get executed successfully and you can see the results in View Results Tree window.

  • We are able to run one REST API method successfully for one time. As specified above, you could run this script many number of times/forever by specifying the 'Loop Count' in Thread Group.

Oct 13, 2015

Forgetfulness plays a major role in QA engineers life

Forgetfulness plays a major role in everybody's life. In QA engineers life, forgetfulness can be an expensive thing.

Assume you are executing a test plan, and you have some more minor/average cases in your mind to be executed. You want to execute those cases after completion of the test plan, but you forgot to execute them, or you found a minor/average defect during the test plan execution itself. You planned to log that defect later as it is a minor/average defect. If this defect is reported by a customer then it is an expensive thing, and we always get a question like "Why QA missed it?".

We should report defect immediately whenever we find. We should not move to next case until we report all issues we found.

A few of the scenarios that came to my mind are listed below

A junior engineer wrote a test plan and sent for review to a senior engineer. Senior engineer forgot to review the test plan. Junior engineer reminded twice, but senior engineer forgot due to some other tasks. Junior engineer might have missed some important cases. Customers may report issues on those missed cases only.

We should review the test cases without fail.

You found an abnormal behaviour of product/project and you are not sure that it is a defect or not. You want to get confirmation from the developer or higher management. At that time, both are not available. You may forget to discuss it with them. Customer may find a defect in the same case.

We should clear our doubts with Dev or higher management. If they are not available we should drop a mail at least.

Assume you got a critical bug to verify for a major release which is planned 5 months later. That defect verification includes a lot of integration steps and also includes third party settings. You interacted with developers and searched in google and found all required steps. You set the environment and verified that defect. After 3 months, one customer asked for Hotfix release with this defect or our higher management planned for a service pack release with this defect. Now you need to verify this critical defect again which includes a lot of steps. You might have forgotten all these steps required. You need to interact with developers and search google again for the same steps. A lot of time will be wasted.

A final scenario where we should realise why documentation, not liked by most of us, is actually very important!

One of our team members verified this critical defect for the major release and  resigned. Some other team member needs to spend the same amount of time.

The key to some best practices to be followed by QA is, to document all the steps required to verify a defect.